Pardot for Nonprofits: A Tale of Two Email Builders

This is the fourth article in the series ‘Pardot for Nonprofits’. See previous posts on engagement, prospects, & CTAs, and utilizing Engagement Studio.

By now, you may have heard that there’s a new Pardot email builder in town. Email Template Builder – or Lightning Email Builder as it’s more commonly known – is a drag-and-drop style builder modeled after the Salesforce Lightning App Builder. Hosted fully in Salesforce, the new builder is completely independent from the Pardot Email Builder yet remains fully compatible with Pardot. In this post, we aim to highlight some of the key differences between the classic Pardot Email Builder and the new Lightning Email Builder as well as guide you through implementing this tool for your team.
What Our Clients Are Excited About
Buttons

If you have something like this safely tucked away on your desktop so that you don’t have to go through the pain of building a custom button more than once, you will be overjoyed to hear that the Lightning Email Builder has a built-in button component that makes emails with multiple CTAs a breeze! Simply drop the button component onto the canvas and enter values for style and content.

Reduced Learning Curve
Email marketers do not need to know how to write html to create complex multi-column layouts using the new builder. With six pre-configured layout components to choose from as well as the option to use the component editor to easily create a custom layout, <td> and <tr> are a thing of the past.

Broader Applications
Pardot Email Templates can be used in Pardot-based automation (e.g., automation rules), 1:1 emails sent from within the Salesforce Activity Timeline, and Pardot list emails. The Lightning Email Builder takes this a step further and allows Pardot marketers to design branded email templates to be used in Salesforce Flows. See this article from Salesforce to learn how.
Is Anything Missing?
The Pardot product team has done a great job these past few releases integrating more and more core Pardot Email functionality into the new builder. However, there are still a few features not yet compatible with the Lightning Email Builder:
1. Dynamic Content
2. A/B Testing
3. Litmus Testing
4. Easy access to the full html document. *Tip: you can still access the full html of any Lightning Email Template if you go to the Developer Console and paste in the following SOQL command:

What to Know if You Make the Switch
Be prepared to spend a few hours on content migration

Pardot Email Templates and Pardot Files do not easily transfer to the Lightning Email Templates and Salesforce Content Management System (CMS) model. You can copy and paste in sections of core html snippets from your emails and reference your Pardot image files using the <src> tag, but this is slow and tedious work. Our recommendation is to use the migration to Lightning Email Builder as an opportunity to redesign your digital brand or be ready to spend a few hours transferring your most-used images over into Salesforce CMS and building Lightning-ready version of your email templates.
The Lightning Email Builder only works in Lightning and requires that your campaigns are managed in Salesforce (i.e., Connected Campaigns)
With Salesforce recently announcing they will retire Pardot Classic after October 2022, there’s no better time to upgrade to the latest Lightning-compatible features. Not sure where to start with connected campaigns? Check out this implementation guide.
Salesforce CMS is the preferred content management system for the Lightning Email Builder
Plan to set aside a few hours to configure Salesforce CMS. While you can continue to copy and paste image URLs into the image components of the Lightning Email Builder, CMS is a straightforward and robust alternative to Pardot files and is worth the time spent to get it implemented correctly. Wondering whether you can simply use Salesforce files instead of CMS? Unfortunately, while the Lightning Email Builder will allow you to add Salesforce files to your templates, you cannot use templates made with files to send mass emails through Pardot.
You will need a Salesforce Admin’s help
To enable the Lightning Email Builder, you will need to have delegated or full system administrator access to Salesforce.
Ready to make the switch? See below for step-by-step instructions for configuring Lightning Email Builder in your org!
How to Set Up Lightning Email Builder and Salesforce CMS

Ensure you have Connected Campaigns enabled in Pardot
- Go to Pardot Settings > Connectors > Salesforce.com > Actions > Edit Settings
- Select the Connected Campaigns tab
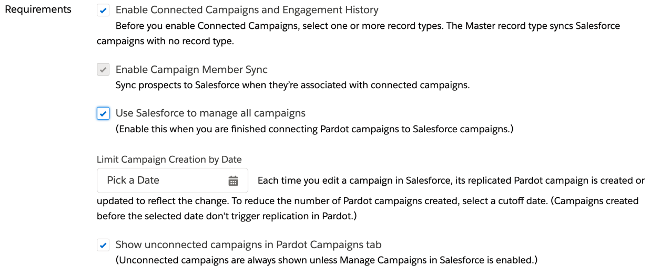
- If you have connected campaigns enabled, your setup should look like something like this:
- If you don’t have connected campaigns enabled, utilize this implementation guide. If you have many existing Pardot campaigns you need to migrate into Salesforce, check out the Connect Multiple Pardot and Salesforce Campaigns at Once section of the guide to learn about Pardot’s built-in campaign migration tool.
Upgrade your Pardot account to Handlebar Merge Language (HML)
It’s entirely likely that you have already enabled HML in your Pardot account. If you’re unsure, open the Pardot dashboard and look for a toast at the top of the page encouraging you to upgrade. The process is straightforward and has no negative effects on your existing assets, but be sure to check out this FAQ article for more information.
Once HML and Connected Campaigns are properly configured, switch back to Salesforce Setup and search for Content Setup
Complete steps 2 of the Content Setup wizard: Grant Admin and User Access
Grant the permission set created in Step 2 of Content Setup to any user who needs access to Lightning Email Builder and Salesforce CMS (tip: add all your Pardot permission sets to a Permission Set Group to make creating new Pardot users easy).
Complete step 3 of the Content Setup wizard: Configure CMS for the Content Experience
- Create a Pardot workspace by navigating to the CMS Workspaces object and selecting “Add Workspace”

- Next, open the CMS Channels tab
- Select “Create Channel” and choose a name to indicate this channel will host your Pardot content
- Choose Public as your connection type
- Save and add it to the workspace you created earlier
- Select the dropdown menu next to your new channel and edit

- Choose your mydomain as your domain and enable the channel

- Save
Next, go to the Salesforce CRM and find the Salesforce CMS app

Find the Pardot Workspace you created earlier
Add any users that need to create Lightning Email Templates as Contributors

Finally, ask your Salesforce admin to make sure the profiles used by you and your other Pardot marketers have full CRED access to the Email Template and Email Content objects!
The Salesforce Lightning Email Builder is the best new tool in town. Once you implement it and your team gets comfortable using it, you’ll be well on your way to creating beautiful marketing emails that suit your needs and your goals.