Easily Migrate to FSLogix: A Guide to Transition from Existing Profile Management Solutions


Migrating to FSLogix? Are you looking to enjoy the benefits of FSLogix’s containerized profiles for Windows and Office? Do you currently manage a profile solution in your environment?
FSLogix offers consistent logon duration times and reduced administration, even with thousands of files and folders in user profiles. This guide will cover common migration scenarios and methods for moving from your current profile management solution to FSLogix.
Advantages of Migrating to FSLogix Containerized Profiles
Many customers today are looking to take advantage of the benefits of FSLogix containerized profile and Office container VHDX storage.
There are a few well-known benefits of FSLogix containerized profile usage:
- Users usually note a more consistent logon duration time, even with thousands of files/folders in the user profile
- Attachment and loading of the user profile container VHDX occurs with the same relative speed whether there are hundreds of thousands of files/folders in the user profile
- Admins note ongoing administration of the user profile file/folder content with exclusions or inclusions to maintain speedy logon times is significantly reduced as compared to a roaming profile file/folder upload/download solution
Most customers looking to utilize FSLogix for these benefits are not deploying FSLogix in a greenfield setup – most have existing profile management solutions with valued user personalization data that needs to be retained while migrating to FSLogix.
CDI has an extensive background in the options for migrating from an existing profile management solution to FSLogix and will highlight several common migration scenarios and methods below. We have used these migration methods for Citrix Virtual Apps and Desktops, VMware Horizon, and Azure Virtual Desktop customers.
Advantages:
- Consistent logon duration even with thousands of files/folders
- Quick attachment and loading of user profile container VHDX
- Reduced administration for maintaining speedy logon times
Migrating from Citrix Profile Management (CPM/UPM) to FSLogix
TL;DR:
Citrix customers often use Citrix Profile Management (CPM/UPM) for profile management, with profiles stored on a NAS or Windows file server share. Migrating from CPM to FSLogix involves running a PowerShell script that performs various tasks, including creating an FSLogix share subfolder structure and copying CPM folder/files for each user.
- Use a PowerShell script to automate migration
- Modify the script for your specific directory structure
- Migrate users in phases or all at once
Overview & How To:
Most Citrix customers utilize Citrix Profile Management (CPM/UPM) for roaming profile management. These profiles are typically stored on a NAS or Windows file server share.
Files and folders are copied at logon to the VDA session and copied to the file server share at logoff. The first-time user logon utilizes the default user profile to build the user profile which is OS platform specific.
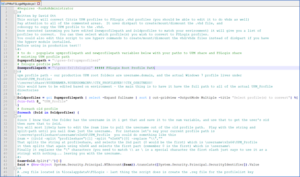
The quick overview of the process for migration is to run a PowerShell script, which for each user’s CPM profile does the below:
- Creates a user profile ProfileList subkey
- Creates FSLogix share subfolder structure for FSLogix VHDX profile container files
- Sets permissions on the user subfolder in the share for the user
- Creates FSLogix VHDX file for the user profile container in the user subfolder
- Copies CPM folder/files for the user into the VHDX profile container
The admin can either migrate all users at once and update the parent VM to use FSLogix Apps the next day OR they can migrate users in phases to a new Delivery Group/Machine Catalog with FSLogix Apps as they are PowerShell script migrated.
The script, created by David Ott, is available HERE. It requires modifications for your directory structure source and target.
Transitioning from VMware DEM Personalization Settings to FSLogix
TL;DR:
For customers using VMware Dynamic Environment Management (DEM) Personalization settings, migrating to FSLogix involves running both VMware DEM Personalization settings and FSLogix configuration concurrently. Once the FSLogix VHDX profile container is seeded, decommission VMware DEM Personalization settings (leaving VMware DEM User Environment settings ON). Follow the steps outlined in the guide for a smooth migration process.
- Co-exist with FSLogix and VMware DEM Personalization settings during the migration phase
- Disable VMware DEM Personalization settings once FSLogix VHDX profile container is seeded
- (Optional) Decommission VMware DEM completely if user environment functionality is not needed
Overview & How To:
Some customers utilize VMware Dynamic Environment Management (DEM) Personalization settings for managing the user personalization experience. Profile configuration settings per application or setting are typically stored on a NAS or Windows file server share in the form of compressed archive files.
These compressed archive files are extracted at logon and loaded on top of a default user profile for the active user session. At logoff, folders and files are compressed into archive files on the file server share.
The first-time user and all subsequent logins utilize the default user profile each time to build the user profile.
The quick overview of the process for migration is to run VMware DEM Personalization settings AND FSLogix configuration at the same time until the FSLogix VHDX profile container is seeded before decommissioning VMware DEM Personalization settings (leaving VMware DEM User Environment settings ON) per the below steps:
- Co-existence phase
- Install and configure FSLogix (GPO settings, FSLogix Apps) in parent VM alongside VMware DEM and publish an update
- Test/validate
- Use RSOP.MSC to verify FSLogix GPO and VMware DEM GPO applying
- Verify VMware DEM archives are being modified
- Verify FSLogix VHDX profile container is generated
- Verify personalization settings persist across logoffs
- Run 2-3 days and verify FSLogix file server share subdirectories seeded for all users
- Turn off VMware DEM Personalization settings
- Generate updated VMware DEM config with Personalization settings removed using updated file server share/GPO pointer. At this point, users are using FSLogix exclusively for profile management and VMware DEM Personalization settings are off.
- Test/validate
- Use RSOP.MSC to verify FSLogix GPO and VMware DEM GPO applying
- Verify VMware DEM archives are NOT being modified
- Verify FSLogix VHDX updating
- Verify personalization settings persist
- Decommission VMware DEM completely (optional if user environment functionality is also not being used going forward)
- Recreate all necessary VMware DEM User Environment settings with Group Policy/Preferences
- Remove VMware DEM agent from image and unlink VMware DEM GPO
Switching from Windows Roaming Profiles to FSLogix
TL;DR:
If you are using Windows roaming profiles, the migration process is like that of Citrix Profile Management. Run a PowerShell script that creates a user profile ProfileList subkey, FSLogix share subfolder structure, and performs other necessary tasks. The script used is the same as for Citrix Profile Management.
- Use the same PowerShell script as in the Citrix Profile Management migration
- Modify the script for your specific directory structure
- Migrate users in phases or all at once
Overview & How To:
Some customers utilize Windows roaming profiles for roaming profile management. These profiles are typically stored on a NAS or Windows file server share.
Files and folders are copied at logon to the session and copied to the file server share at logoff. The first-time user logon utilizes the default user profile to build the user profile which is OS platform specific.
The quick overview of the process for migration is to run a PowerShell script, which for each user’s Windows roaming profile does the below:
- Creates a user profile ProfileList subkey
- Creates FSLogix share subfolder structure for FSLogix VHDX profile container files
- Sets permissions on the user subfolder in the share for the user
- Creates FSLogix VHDX file for the user profile container in the user subfolder
- Copies Windows roaming profile folder/files for the user into the VHDX profile container
The admin can either migrate all users at once and update the parent VM to use FSLogix Apps the next day OR they can migrate users in phases to a new Pool/Delivery Group/Machine Catalog with FSLogix Apps as they are PowerShell script migrated.
The script used is the same as used for Citrix Profile Management above. The script must be modified for the directory structure source and target.
Moving from Liquidware ProfileUnity Portability to FSLogix
TL;DR
When migrating from Liquidware’s ProfileUnity Portability, run both ProfileUnity Portability and FSLogix configuration simultaneously. Once FSLogix VHDX profile containers are seeded, decommission ProfileUnity Portability. Follow the steps provided in the guide for a successful transition.
- Co-exist with FSLogix and ProfileUnity Portability during the migration phase
- Disable ProfileUnity Portability once FSLogix VHDX profile container is seeded
- (Optional) Decommission ProfileUnity completely if user environment functionality is not needed
Overview & How To:
Some customers utilize Liquidware’s ProfileUnity Portability for managing the user personalization experience. Profile configuration settings per application or setting are typically stored on a NAS or Windows file server share in the form of compressed archive files.
These compressed archive files are extracted at logon and loaded on top of a default user profile for the active user session. At logoff, folders and files are compressed into archive files on the file server share.
The first-time user and all subsequent logons utilize the default user profile each time to build the user profile.
The quick overview of the process for migration is to run ProfileUnity Portability AND FSLogix configuration at the same time until the FSLogix VHDX profile container is seeded before decommissioning ProfileUnity Portability per the below steps:
- Co-existence phase
- Install and configure FSLogix (GPO settings, FSLogix Apps) in parent VM alongside ProfileUnity Portability and publish update
- Test/validate
- Use RSOP.MSC to verify FSLogix GPO and ProfileUnity GPO applying.
- Verify ProfileUnity archives are being modified
- Verify FSLogix VHDX profile container is generated
- Verify personalization settings persist across logoffs
- Run 2-3 days and verify FSLogix file server share subdirectories seeded for all users
- Turn off ProfileUnity Portability
- Generate updated ProfileUnity config with Portability settings disabled (using updated configuration INI) and replace existing
- Remove ProfileUnity GPO from and reboot desktops. At this point, users are using FSLogix exclusively for profile management and ProfileUnity Portability settings are off.
- Test/validate
- Use RSOP.MSC to verify FSLogix GPO and ProfileUnity GPO applying
- Verify ProfileUnity archives are NOT being modified
- Verify FSLogix VHDX updating
- Verify personalization settings persist
- Decommission ProfileUnity completely (optional if user environment functionality also not being used going forward)
- Recreate all necessary ProfileUnity user environment settings with Group Policy/Preferences
- Remove ProfileUnity agent from image and unlink ProfileUnity GPO
Upgrading from Liquidware ProfileUnity ProfileDisk to FSLogix
TL;DR:
To migrate from Liquidware’s ProfileUnity ProfileDisk, run a PowerShell script that performs various tasks, such as converting the ProfileUnity Profile disk from VHD to VHDX format and moving user data to an FSLogix-supported folder structure. The script can be found HERE and customized by CDI.
- Use a customized PowerShell script for the migration process
- Convert ProfileDisk from VHD to VHDX format and move user data to FSLogix supported folder structure
Overview & How To:
Some customers utilize Liquidware’s ProfileUnity ProfileDisk for managing the user personalization experience. ProfileDisk disks are typically stored on a NAS or Windows file server share in the form of VHD files like FSLogix VHDX profile containers.
These VHD ProfileDisk disks are mounted at logon for the active user session. At logoff, the ProfileDisk disks are unmounted.
The first-time user logon utilizes the default user profile to build the user profile which is OS platform specific.
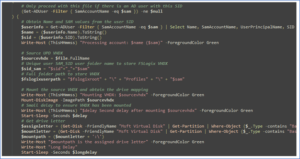
The quick overview of the process for migration is to run a PowerShell script which for each user’s ProfileDisk profile disk does the below:
- Extracts all required user Active Directory attributes and use them to match the desired FSLogix naming convention
- Converts the ProfileUnity Profile disk from VHD to VHDX format and compacts it
- Mounts the ProfileUnity disk and moves all user data to a FSLogix supported folder structure inside the FSLogix VHDX profile container
- Dismounts the new FSLogix VHDX profile container, moves it to the FSLogix VHDX profile container file server share, and assigns appropriate permissions to it
The script used for this process is located HERE and customized by CDI.
Converting Local Profiles (Citrix or VMware) to FSLogix
TL;DR:
For customers using zero roaming profile management, the migration process involves running a batch script that creates an FSLogix share subfolder structure, FSLogix VHDX file and uses the ‘frx.exe’ utility to copy profile folders and files for each user. This process is suitable for a small number of persistent desktops. For larger groups, consider converting users to use Windows roaming profiles first.
- Use a batch script for migrating local profiles to FSLogix VHDX profile container
- Migrate users in phases or all at once
Overview & How To:
Some customers utilize zero-roaming profile management where user profiles are stored on the local disk of virtual machines or traditional PC’s.
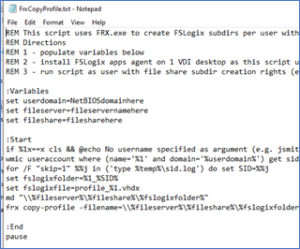
The quick overview of the process for migration is to run a batch script (below) logged on to the source machine. The script does the following:
- Creates FSLogix share subfolder structure for FSLogix VHDX profile container files for the user profile to be migrated
- Creates FSLogix VHDX file for the user profile container in the user subfolder
- Runs the ‘frx.exe’ utility from FSLogix Apps to copy profile folder/files for the user into the VHDX profile container in the file server share directory structure
The admin can either migrate all users at once and update the parent VM to use FSLogix Apps the next day OR they can migrate users in phases to a new Pool/Delivery Group/Machine Catalog with FSLogix Apps as they are PowerShell script migrated. Note that this process requires the admin to log on to each individual machine or use a scheduled task on each to run the script. As a result, this process is meant for a small number of persistent desktops. For a larger group, it would be better to convert users to use Windows roaming profiles as a first phase before converting the file server share structure with the above-mentioned processes.
Conclusion
Today, customers are looking to take advantage of the many benefits FSLogix’s containerized profile approach provides. From drastic improvements to user logon times to the overall reduction in administration of the profile solution. FSLogix has consistently shown why they are a leader in the profile solution space.
Migrating from an existing profile management solution to FSLogix can be complex and time-consuming. With an extensive background in FSLogix profile migrations, CDI has an array of options at our disposal to make sure your profile migration project is done quickly and successfully.